As privacy regulations become increasingly stringent, the importance of compliant and user-friendly consent management solutions has never been greater. Google Consent Mode v2 and Cookie Notice Pro offer a powerful combination for website owners looking to navigate the complex landscape of GDPR compliance while maintaining optimal user experience. With built-in support for Google Consent Mode v2 Advanced, Cookie Notice Pro 2.0 empowers websites to honor their visitors’ privacy preferences seamlessly, paving the way for a transparent and trust-building online experience.
Understanding the Tools
Google Consent Mode v2 allows website owners to adjust the behavior of their Google tags based on the consent status of their users. This means that analytics and advertising scripts can be dynamically modified to respect user preferences, aligning with GDPR requirements.
Cookie Notice Pro is a plugin designed to make GDPR compliance straightforward. It provides a customizable platform for displaying consent notices and managing user consent preferences efficiently.
The Integration Process
Integrating Google Consent Mode v2 with Cookie Notice Pro is simple and straight-forward:
1. Download the Cookie Notice Pro plugin
Visit Flerosoft.com and download the Cookie Notice Pro plugin. Begin by initializing Cookie Notice Pro on your website to ensure that the consent banner is displayed to users upon their arrival. You can refer to the documentation for installation steps.
2. Enable Consent Mode V2
Once you download the plugin files, go to cookienoticepro.script.js, and in the config, change enableGoogleConsentMode to true. If consent is granted and preferences include “analytics“, analytics_storage is set to ‘granted’ through gtag dataLayer. Similarly, if consent is granted and preferences include “marketing“, ad_storage, ad_user_data, and ad_personalization are set to ‘granted’.
Note: analytics_storage, ad_storage, ad_user_data, and ad_personalization are parameters provided by Google.
analytics_storage : Controls consent for cookies or identifiers that are used for analytics purposes.ad_storage : Manages consent for cookies or identifiers used for advertising purposes, including ad delivery and personalized ads.ad_user_data : Introduced in Consent Mode version 2, this parameter offers finer control over the collection and use of user data for advertising.ad_personalization : Controls the consent for personalizing ads based on the user’s behavior and preferences.
3. Setup gtag code on your website
If not already installed, install the Google gtag code on your website. It will look something like this below.
<!-- Google tag (gtag.js) -->
<script async src="https://www.googletagmanager.com/gtag/js?id=TAG_ID"></script>
<script>
    window.dataLayer = window.dataLayer || [];
    function gtag(){dataLayer.push(arguments);}
    gtag('js', new Date());

    gtag('config', 'TAG_ID');
</script>
4. Default Consent Configuration
Utilize the gtag function to set the default consent state for various data processing activities to ‘denied’. This ensures that all processing activities are compliant with GDPR from the outset.
<script>
gtag('consent', 'default', {
  'ad_storage': 'denied',
  'ad_user_data': 'denied',
  'ad_personalization': 'denied',
  'analytics_storage': 'denied'
});
</script>
5. Final Head Code
Your final head code should look something like the below example snippet. Please note the order is important. Code should be in following order:
- Define dataLayer and the gtag function. Set default consent to ‘denied’ as a placeholder
- Google tag (gtag.js) script
- jQuery Import
- Cookie Notice Pro
<head>
    <meta charset="UTF-8">
    <meta http-equiv="X-UA-Compatible" content="IE=edge">
    <meta name="viewport" content="width=device-width, initial-scale=1.0">

    <script>
        // Define dataLayer and the gtag function.
        window.dataLayer = window.dataLayer || [];
        function gtag(){dataLayer.push(arguments);}

        // Set default consent to 'denied' as a placeholder
        gtag('consent', 'default', {
          'ad_storage': 'denied',
          'ad_user_data': 'denied',
          'ad_personalization': 'denied',
          'analytics_storage': 'denied'
        });
    </script>

    <!-- Google tag (gtag.js) -->
    <script async src="https://www.googletagmanager.com/gtag/js?id=TAG_ID"></script>
    <script>
        window.dataLayer = window.dataLayer || [];
        function gtag(){dataLayer.push(arguments);}
        gtag('js', new Date());
        gtag('config', 'TAG_ID');
    </script>
    <!-- End Google tag (gtag.js) -->


    <!-- jQuery Import -->
    <script src="https://ajax.googleapis.com/ajax/libs/jquery/3.7.1/jquery.min.js"></script>

    <!-- Cookie Notice Pro -->
    <link rel="stylesheet" href="./cookienoticepro.style.css">
    <script src="./cookienoticepro.script.js"></script>
    <script>
        // Initialize cookie consent banner
        $(document).ready(function() {
            cookieNoticePro.init();
        });

        // IMPORTANT: If you are not showing cookie preferences selection menu or google consent mode,
        // then you can remove the below function
        const injectScripts = () => {
            // Example: Google Analytics
            if (cookieNoticePro.isPreferenceAccepted("analytics") === true) {
                console.log("Analytics Scripts Running....");
            }
            // Example: Google Adwords cookie, DoubleClick, Remarketing pixels, Social Media cookies
            if (cookieNoticePro.isPreferenceAccepted("marketing") === true) {
                console.log("Marketing Scripts Running....");
            }
            // Example: Remember password, language, etc
            if (cookieNoticePro.isPreferenceAccepted("preferences") === true) {
                console.log("Preferences Scripts Running....");
            }
        }
    </script>
    <!-- End Cookie Notice Pro -->

    <title>Cookie Notice Pro | Advanced jQuery Cookie Consent Plugin</title>
</head>
Google consent mode v2 reference: https://developers.google.com/tag-platform/security/guides/consent?consentmode=advanced#implementation_example
Ref: Injecting Scripts – https://codecanyon.net/item/cookie-notice-pro-advanced-jquery-plugin/32069094/faqs/51085
How to Check if Google Consent Mode v2 is working or not with Cookie Notice Pro
Google Consent Mode v2 allows you to adjust how your Google tags behave based on the consent status of your users. With Cookie Notice Pro by Flerosoft, you can easily integrate and manage user consent for various purposes such as analytics and marketing. Once you have implemented Google Consent Mode v2, it’s crucial to verify that it is functioning correctly. In this article, we will guide you on how to check if Google Consent Mode v2 is working using the console and inspecting the dataLayer.
1. Open the Browser Console
To verify the functionality, open your website where you have implemented the consent mode. Then, open the console in your web browser:
- For Chrome: Right-click on your webpage and select “Inspect”, then navigate to the “Console” tab.
- For Firefox: Right-click on your webpage and select “Inspect Element”, then click on the “Console” tab.
- For Safari: Enable the “Develop” menu in Safari’s preferences, then choose “Show Web Inspector” from the “Develop” menu and select the “Console” tab.
2. Inspect the dataLayer
The dataLayer is where Google Consent Mode stores consent-related information. You can check the consent status by inspecting the dataLayer entries. Type the following command in the console and press Enter:
<script>
console.log(window.dataLayer);
</script>
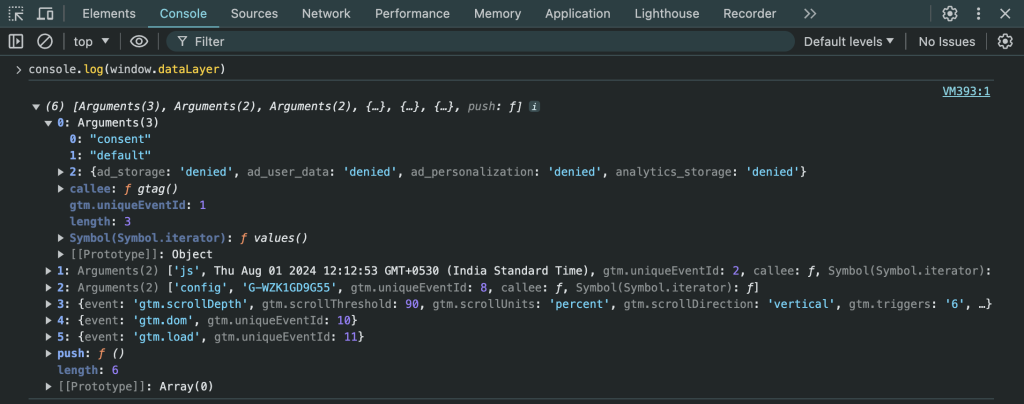
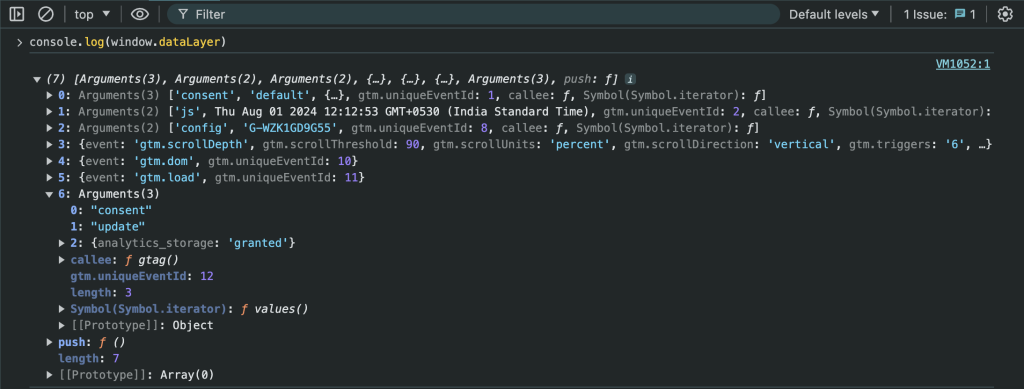
You will see an output similar to the one below:

In the screenshot, you can observe the following entries:
Before Consent:
- ad_storage: ‘denied’
- analytics_storage: ‘denied’
- ad_user_data: ‘denied’
- ad_personalization: ‘denied’
This indicates that all storage types are denied because the user has not accepted the consent.
After Consent (when analytics consent is accepted):

analytics_storage: ‘granted’
This shows that analytics storage is now granted, indicating the user has accepted the consent for analytics.
Similarly, if consent is granted and preferences include “marketing”, ad_storage, ad_user_data, and ad_personalization are set to ‘granted’.
3. Verify Consent Acceptance
Once the user interacts with the consent banner (provided by Cookie Notice Pro) and accepts or denies consent, the dataLayer should update accordingly.
4. Test Different Consent Scenarios
You can test various scenarios by accepting or denying different types of consent (e.g., marketing, ads) and observe the changes in the dataLayer. This helps ensure that the consent mode is functioning as expected for all consent types.
By following these steps, you can ensure that Google Consent Mode v2 is correctly implemented and functioning, thereby complying with user consent preferences and regulations.
Conclusion:
Integrating Google Consent Mode v2 with Cookie Notice Pro is an effective way to ensure GDPR compliance while respecting user consent. This approach not only enhances user trust but also allows website owners to leverage Google’s analytics and advertising services within the boundaries of privacy regulations. Through careful implementation and ongoing management of consent preferences, developers can create a privacy-focused environment that aligns with current legal requirements and user expectations.